How to use ProDiscover
Project Name: How to use ProDiscover
Description: Step by step guide to How to use ProDiscover Incident Response customization
Author: Rohit D Sadgune
Summary of Contents
In this blog we will learn following things
- How to start prodiscover incident response
- How to use ProDiscover
- Project number & case files
- ProDiscover Preferences
- ProDiscover Index path
- Appearances
- ProDiscover Report Custom Items
Most of the digital forensics analysis software’s needs to be customized before to load case. Computer forensics software are complete customizable depend on cases to case. Here I will demonstrate how to perfrom changes in prodiscover to create strong forensics case.
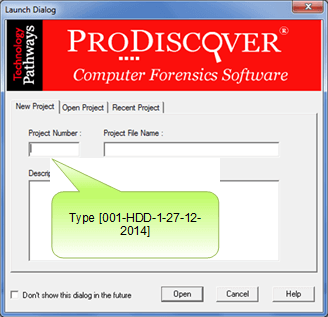
Just double click on Prodiscover icon which is there in system. Following screen will appear. Left click on “Project Number”

Type your forensics case number as [001-HDD-1-27-12-2014] & project file name as [PIRCUSTOM-001-HDD-1-27-12-2014].
People always used to ask what should be standard evidence number, standard forensics project file name here is the solution.
PIRCUSTOM-Prodiscover custom is name what I have given. In normal case it should be case initials i.e client name or forensics case reference e.g (Fraud Investigation, Espionage)
001- It is first case for respective client. During the investigation if new scenario comes into picture then it will be 002.
HDD-1- It is first disk what we are investigating. If you have multiple HDD the you can give put like HDD-1-H2-H3.
27-12-2014- Date for case reference.


Click open button to start forensics case in prodiscover.
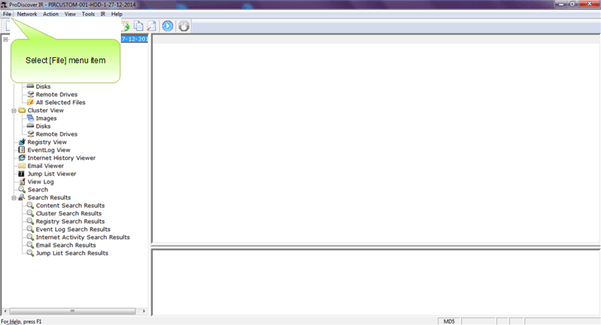
After opening case in prodiscover it will show three pane view with case name as title now please elect file menu from PIR to get preference

Now you will get multiple options to select out of which please select preferences

Here you will get option depending on versions i.e in prodiscover forensics version you will not get menu of “PDServer”. In prodiscover incident response version you get menu to PDServer. General menu you will get
- General
- PDServer (Prodiscover Incident Response)
- Apperance
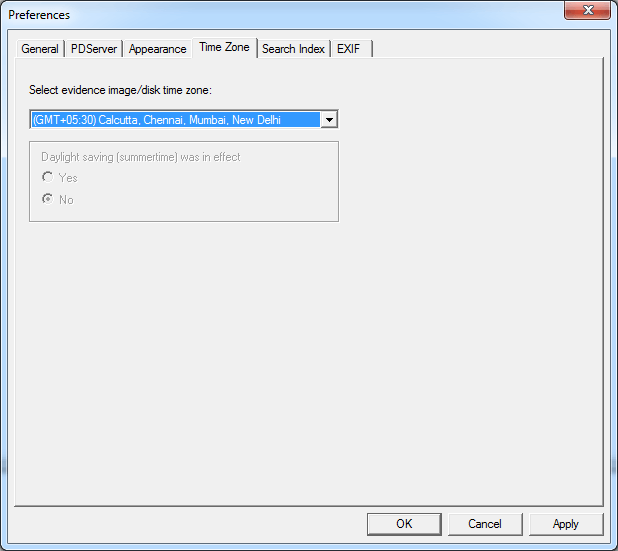
- Time zone
- Search Index
- EXIF
General
Now select “General” menu from given window

Hash is basically used for verification of forensics images are in identical condition or not.
Here you can select multiple Hashing algorithm
Prodiscvoer provides three hashing algorithms
- MD5 :- It is 128 bit hash. It is most commonly used has algorithm in India.
- SHA-1 :- It is forensics more accurate & widely recommended for forensics hash verification
- SHA-256 :- It is highly secured but time consuming


Here I have selected MD5 hash algorithm as it takes very less time for verification.
Warning: Turning on “Auto Verify Image Checksum” will cause image addition and project loading to become very slow.
Please on both the services
- Warning
- Auto verify checksum: – This will increases project load time as it verifies evidence for checksum.

Now we have to select working folder.
ProDiscover uses a “Working Folder” to persist temporary files in during investigation operations such as generating hash values. By default the “Working Folder” is set to use the current users Documents and Settings temporary folder. Users may select any desired location as the ProDiscover “Working Folder”.
Select appropriate path of system for working folder.

The “When a disk/image cannot be found while opening the project:” this setting is primarily developed for user who is doing remote investigation. This setting is primarily known as as “offline project mode” and includes the choices “Prompt Me”, “Add as Offline”, and “ignore”. When user is working on remote system investigation you can add & save search result & project report to project file.
We also need to choose the maximum file size to be carved from evidence image or drive.
Default max. Size of file carving in prodiscover is 2 MB.
Click on “Office X files as folders” this setting is for MS-Office files which are based on 2007, 2010, 2013 & so on.
Click on “Compressed files as folders”

PDServer
“PDServer” is the menu available only in ProDiscover Incident Response. Here you can set default port number to communicate disk access.Investigator can customize this port number as per his network environment.
PDServer for network imaging & analysis. The “Server Time-out” setting tells ProDiscover how much time he needs to wait without receiving packets before trying to reestablish communications with the PDServer Remote Agent. The “Auto Retries” setting helps ProDiscover how many times to automatically attempt to reestablish communications after a “Server Time-out” has occurred.

Appearance
As others forensics analysis software we can also customize appearance of prodiscover.
Here you can change color of…
- Hash files :- Many commercial databases use hash files as a method of indexing data
- Compressed files: – Compress files are compound file in which multiple files are gather in single compound file.
- Alternate Data Streams (ADS):- An alternate data stream (ADS) is a feature of Windows New Technology File System (NTFS) that stores a metadata for locating a specific file by author or title.
- Subset
- Mismatch files: – These files provides beneficial data which filtered from prodiscover.

The most import component of forensics analysis is reporting. We can change the form of report as per our requirement. In prodiscover we can customize following aspects
- Font
- Font size
- Font style
- Effect
- Colour
- Script

Add following thing to get more interactive report for Client
- Add Thumbnail image to report for graphic file
- Create thumbnail on load
- Include cluster chain information to evidence of interest
- Include Access Control List (ACL) to evidence of interest
- Include outlook message header to report

Time Zone
Entire forensics analysis is depends on time references.so Select appropriate time zone.
As the NTFS file system persists time zone information with files, it is important for digital forensics investigators to set the proper image or disk time zone information to ensure MAC (Modified, Accessed and Created) times are displayed as they would be appear on the target system.
Modified, Accessed and Created times are displayed in prodiscover based on the following scenarios.
- When System’s daylight saving time is ON and ProDiscover’s daylight saving time is ON, the times will be the same as in Windows explorer.
- When System’s DAYLIGHT SAVING TIME is ON and ProDiscover’s DAYLIGHT SAVING TIME is OFF, the times will be reported reduced by 1 hour to what in Windows explorer.
- When System’s DAYLIGHT SAVING TIME is OFF and ProDiscover’s DAYLIGHT SAVING TIME is ON, the times will be displayed increased by 1 hour to what in Windows explorer.
- When System’s DAYLIGHT SAVING TIME is OFF and ProDiscover’s DAYLIGHT SAVING TIME is OFF, the times will be displayed the same as in Windows explorer.
Note: The times displayed in the report are based on the times when the files are selected as Evidence Of Interest.

Forensics Search Index
Forensics index is is in a method of simply a generating list of offsets for occurrences of keywords. In simpler way an index is a file which stores a list of offsets for each word in which there on HDD. Searching the index amounts to looking up the index file for a list of offsets.
A thesaurus file contains a list of synonyms the search engine can use to find matches for particular words if the words themselves don’t appear in documents.
The noise file contains noise words sometimes referred to as stop words. These are conjunctions, prepositions and other words such as AND, TO and A that appear often in documents yet alone may contain little meaning.
A basic noise.txt is available as you going to install prodiscover.

Here you have to select appropriate index path.i.e location where you want to keep your forensics index. Note: – Best practice is to keep within case folder.
By default ProDiscover is set to index “All index able files” This means that during the process of indexing ProDiscover will scan every file and any file containing readable ASCII or UNICODE data will be indexed. This process is more time consuming but more reasult oriented. To select this feature please click on “All Index able Files”. Users are alsochoose to give the option to index files only for specific file extensions. This optios is going to reduce time of indexing.
You also have option to create forensics index of clusters & sectors. Prodiscover also gives extended feature to index frees space & slack sectors.
EXIF
Exchangeable image file format (officially Exif, according to JEIDA/JEITA/CIPA specifications) is a standard that specifies the formats for images, sound, and ancillary tags used by digital cameras (including smartphones), scanners and other systems handling image and sound files recorded by digital cameras.
Here prodiscover has given the facility to “Add All” EXIF Meta field values to the report, “Remove All” EXIF Meta fields from the report or to custom select field for addition to the project report.

Note: – Entire demonstration of ProDiscvover Customization developed on eduction license of ProDiscover Incident Response


